![]()
![]()
![]()
![]()
![]()
![]()
![]()
AVAYA - Lucent - AT&T Partner Systems (ACS, Endeavor, Partner Plus, Partner II)
All programming is done at
ext. 10 or 11
1) Press feature key, then 00 (enters programming
mode)
2) Press left intercom button twice
3) #103 (code to change system
time)
4) Enter correct time (military time)
5) Press feature key, then 00
(exit programming)
AVAYA - Lucent - AT&T Merlin Legend R1 thru R7
From Main Menu
• Press F1 or System Program
• Press F5 or Exit
• Press F1 or System
• Press F8 or Time
• Back Space Out Old Time and Enter New Time Using 24- hour Format
• Press F10 or Enter
• Press F5 or Exit
• Press Home
AVAYA - Lucent - AT&T Definity
Note: When you change the date and time, some phone displays may not automatically refresh. End-users should press the date/time button on their phone and wait for the terminal to return to "normal" to update the display.
Note for versions G3 R7 and above:
In G3 R7 and above, there are additional fields on the "set/display time" screen. The "Type:" field should be set to standard or daylight savings, depending on which is currently correct. The "Daylight Savings Rule:" field is set to one of 17 rules (0-16) defined on the "change daylight-savings-rule" screen. These entries will automatically set the system time to comply with daylight savings time changes.
Additionally, in the G3r R7 and above with the Multiple Locations feature activated, the above time can be offset + or - on the "change location (1-44)" screen. This screen also allows a different daylight-savings-rule to be used when port networks (PNs) are located in different geographic areas. The location identifier (1-44) is associated with each PN on the "add/change cabinet" screen.
When you change the date or time, some display phones may not automatically refresh the display. If this happens, have each user press the date/time button on their phone and the display should update
Norstar
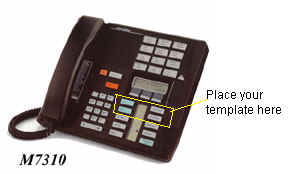
There are a couple of different ways access the time change feature, depending on the type of system you have. A programming template is provided below if you need it. Just cut-out the shaded areas as well as around the outside of the template. Once cut, place the template over the top 2 rows of buttons on your 7310 or 7324 telephone (typically lines 1 and 2 on your telephone).
After you enter programming mode, all methods are pretty much the same.
Access type 1: Press * * TIME (8463)
Access type 2: Press * * ADMIN (23646)
System displays Password & enter 23646
Display shows 1.Sys speed dial
Press Next Display shows 2. Names
Press Next Display shows 3. Time and date
Press Show Display shows Time 16:24
On the Softkey under the display it says CHANGE
If you wish to change the time, press CHANGE, if not press NEXT
Once you pressed the CHANGE button the hour displays;
If you wish to change the hour, press CHANGE, if not press NEXT
Once you pressed the CHANGE button the hour is erased allowing you to enter the new time - enter the new hour in 24 hour format, when OK press NEXT
Once you pressed the NEXT button the minutes display;
If you wish to change the minutes, press CHANGE, if not press NEXT
Once you pressed the CHANGE button the minutes are erased allowing you to enter the new time - enter the new minutes, when OK press NEXT
Follow the same procedure for changing the date!
Programming template
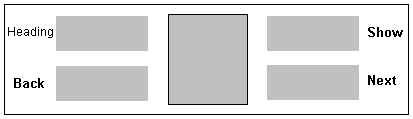
Print this page, cut out the shaded areas with a utility knife and then cut around the outside box. After you're done cutting, place the template over the top 2 rows on your 7310 or 7324 telephone.
Norstar Startalk - Adjust Time and Date
* Note Norstar Voice Mail R. 4 sets its time automatically
from the telephone system
| 1) | Press Feature 984 |
| 2) | Enter the system administrator mailbox and password combination |
| 3) | Press OK |
| 4) | Press Change |
| 5) | Enter < the year, month, and day > NOTE: this is a six digit field. Any single digit month or day must be preceded by a zero. For example February 7, 1991 must be entered as 910207. |
| 6) | Press Next The display changes to show the time |
| 7) | Press CHNG The display shows Enter hhmm: |
| 8) | Enter the < the time in hours and minutes>Note: This is a 4 digit field. Any single digit hour or minute must have a zero preceeding the number. For example, 2:03 must be entered as 0203. |
| 9) | Press AM or PM |
| 10) | To
end the session press Rls |
NEC
NEC DS 1000 and 2000
NEC Elite/ Electra
Programming is done from first 2 station ports on system (2 lowest extension numbers)
1. Press FNC key
2. Dial 9
3. Dial #
4. Dial current time (e.g. 03:29)
5. Press the RECALL key to toggle AM/PM
6. Press the HOLD key to advance to the calendar
7. Press the RECALL key to select the day of the week
8. Press the # key to move the cursor to the day of the month setting
9 Enter the day by using the dial pad
10. Press the RECALL key to select the month
11. Press the # key to move the cursor to the year setting
12. Enter the year by using the dial pad (only the last two digits are entered)
13. Press the FNC key
NOTE: if only setting the time, press the FNC key after making the changes
NEC PROFESSIONAL LEVEL I & NEC PROFESSIONAL LEVEL II
Press FNC button
Dial 9 #
Enter
the hour and minute by using the dial pad
Press RECALL button to change AM / PM setting
Press
HOLD button to
change to calendar
settings
or
Press FNC button to exit
Press RECALL to select day of week
Press
# to move the cursor to day of month field
Enter
day of month by using dial pad
Press RECALL
button to select month
Press # to move the cursor to the year field
Enter last two
digits of year by using dial pad.
Press FNC to exit
Press FNC button
Dial 9
Dial #
Note: Use # and * to move cursor to desired item to
change
Press RECALL button to change AM/PM
setting
Press HOLD button for calendar setting
NEC Mark II
This is done at the Attn station
1. Press CNF then *
2. Dial hour 00-23
3.
Press DSS key 20
4. Dial minute 00-59
5. Press DSS key 20
6. Dial day
of month 01-31
7. Press DSS key 20
8. Dial month using line key 1-12
9.
Press DSS key 20
10.Dial year
11.Press ANS
Panasonic
Samsung
Samsung Digital phone systems... including DCS, DCS Compact, DCS 50si, DCS 400si, iDCS 500, iDCS 100, DS 616
And Samsung Voice mail systems... including SVMi-4, SVMi-8, and Cadence.
This is a multi-step process which involves entering administrator level programming and then setting the date and time. Programming can only be done from a 12 or 24 button display telephone.
SAMSUNG-PROSTAR 816 Plus
To Enable Customer Programming
With the handset on-hook, dial '#06'. The
display shows [MMC DISABLED].
Dial the passcode and '1' then dial
'#'
Password 4321
At this point, the customer programming is open
Setting the Time and Date
After you have enabled customer programming, you may begin the following steps:
Dial '#55'. Display shows[YY MM DD HH
MM]
Dial new information as follows:
YY = Last two digits of the
year
MM = Month (01 - 12)
DD = Day of the month (01 - 31)
W = Day of
the week (1 -7 day of the week begins on Monday & ends on Sunday)
HH =
Hour (Use 24 hour clock)
MM = Minutes (0-59)
Dial '#' to set current
time & date. The phone returns to normal use
Samsung Prostar 816H
This is a multi-step process which involves entering administrator programming and then setting the date and time. Programming can be done from any display telephone.
SAMSUNG-PROSTAR 56/120
Before any programs can be accessed, you must first open system programming using the passcode you have been assigned. This must be done using an 824 display keyset.
While on-hook dial '#20'
Display shows
OPEN SYSTEM PGM - ENTER CODE: Display four digits passcode (1234). Display shows
OPEN SYSTEM PGM - CLOSED
Press MUTE key. Display shows OPEN SYSTEM PGM -
OPENED Press '#'. Keyset returns to idle condition.
Now press '#' and two
digit program code you want to access. Follow the instructions for that
program
Note: You must begin programming within 60 seconds. ONce in programming, any delay of more than 60 seconds between keystrokes will cause the system to automatically close programming.
Should it ever become necessary to correct date and time displayed on all the keysets, do so as soon as it is noticed that it is incorrect. Traffic reports and SMDR records will be of no value when the date and time are not correct.
Diplay Format:
W (Day of the week): Enter 0 for Saturday
MM
(Month): Enter 01 for January and 12 for December
DD (Day of the month):
Enter a number in the range of 01 - 31
YY (Year): Enter the last two digits
of the year
HH (Hours): Use the 24 hour clock and enter a number in the range
of 00-24
MM (Minutes):
Enter a number in the range of
00-59
Note: Failure to enter time in 24 hour clock will cause the
date to change at 12:00 noon
First open customer
programming
ACTION
Dial '#70' Display Shows SET CURRENT
TIME YY MM/DD W HH:MM
Enter current date & time, e.g., 3:15 pm, Mon Jan
6th 1992 SET CURRENT TIME 92 01/06 1 15:15
Press '#' to store and exit If you
entered invalid data, you will receive the [INVALID ENTRY] message for three
seconds.
Re-enter the correct date and time. Should the information that you
entered be incorrect, repeat the procedure
SAMSUNG-PROSTAR 1224
Before any programs can be accessed, you
must first open system programming using the passcode you have been assigned.
This must be done using an 824 display keyset.
While on-hook dial '#20' Display shows OPEN
SYSTEM PGM - ENTER CODE:
Display four digits passcode (1234). Display shows
OPEN SYSTEM PGM - CLOSED
Press MUTE key. Display shows OPEN SYSTEM PGM -
OPENED
Press '#'. Keyset returns to idle condition.
Now press '#' and two
digit program code you want to access.
Follow the instructions for that
program
Note: You must begin
programming within 60 seconds. Once in programming, any delay of more than 60
seconds between keystrokes will cause the system to automatically close
programming.
Should it ever become necessary to correct date and time displayed on all the keysets, do so as soon as it is noticed that it is incorrect. Traffic reports and SMDR records will be of no value when the date and time are not correct.
Diplay Format:
W (Day of the week): Enter 0 for Saturday
MM
(Month): Enter 01 for January and 12 for December
DD (Day of the month):
Enter a number in the range of 01 - 31
YY (Year): Enter the last two digits
of the year
HH (Hours): Use the 24 hour clock and enter a number in the range
of 00-24 MM (Minutes): Enter a number in the range of 00-59
Note: Failure to enter time in 24 hour clock will cause the date to change at 12:00 noon First open customer programming
ACTION
Dial '#70' Display Shows SET CURRENT TIME
YY MM/DD W HH:MM
Enter current date & time, e.g., 3:15 pm, Mon Jan 6th
1992 SET CURRENT TIME 92 01/06 1 15:15
Press '#' to store and
exit
If you entered invalid data, you will receive the [INVALID ENTRY]
message for three seconds. Re-enter the correct date and time. Should the
information that you entered be incorrect, repeat the procedure.
Toshiba
Toshiba Strata VI XII & XX E
From Station 10
Toshiba Strata DK8, DK16, DK24, DK56, DK96
From main console phone (lowest extension number i.e. x100) pick up handset and dial following codes:
For Date: 651 YYMMDD Redial ----(YY=year, MM=month, DD=day)
For Time: 652 HHMMSS Redial ----(HH=hours in 24hr clock, MM=minutes, SS=seconds)
For Day of Week: 653 X Redial ----(X=day of week 1=sunday, 2=monday....etc.)
From Extension port 00 (usualy station 200)